
The colors
This rock uses eight colors: one mid-tone, one highlight, three shades for shading, and three greens for the moss. That sounds like a lot, but each one has a clear job, and you add them one step at a time.
Step 1: Outline

Each stone has an elliptical top and a short rounded side under it, a bit like a cylinder. Start with the tops: the ellipse tool makes it quick. Then add the sides and connect them to the tops. Rocks are forgiving, so if a stone ends up a bit off, it still looks like a rock. Finish with one small stone tucked in between.
Step 2: Color

Fill the stones with the mid-tone. Recolor the outer outline like we always do, since the shape is figured out. But this time keep the inner lines, the contours. They show you how the stones sit on each other, so you don't get lost while you paint.
This is also a good moment to add the background. Seeing the stones against it helps you judge the shading in the next steps.
Step 3: Shading

The light comes from above. So the tops get the most light, the sides get little, and the spots right under each top edge get almost none, because the edge sticks out and blocks the light. That gives you three shades, from light to dark: the far part of each top, the sides, and the areas under the edges.
Use the shading to add a few cracks too. Two or three pixels in a short line is enough. The small stone in the middle sits under the bigger ones, so shade all of it a bit.
Step 4: Highlight

Put a thin line of the light color along the top edges, where the light hits first. In my video I actually block in the highlights in the middle of shading. Knowing where the light goes makes it easier to decide where the shadows go.
Step 5: Moss

Moss makes the rocks look finished and real. I like to put it on its own layer. Start with the lightest green on the tops, then the darker green where there's less light, and sprinkle a few pixels of the darkest green here and there for texture. Don't be afraid to go past the edge of a stone. Moss grows over the sides too.
The finished rocks

You can keep going, adding more moss, more cracks, more texture. But this is already a solid game asset. Try a different cluster on a 62 by 62 canvas: two big stones, or a tall one with a small one at its foot.
A bigger rock
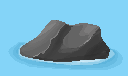
The same steps scale up. This bigger rock stands in water: the planes catch the light from the top left, the dark side goes almost black, and a ring of lighter water around the base sits it on the surface. Try one of your own: a rock on grass, then the same rock in water.