
The two things that give you all the answers
The position of the light source and the shape of the object. That's it. Once you know where the light comes from and what the shape is, the shading almost decides itself. Every rule below comes from those two.
Here are the rules from my shading guide:
- Define the light source.
- Follow the shape.
- Shades get thinner near the terminator.
- Outline tones stay consistent with the light source.
- For lighting: bounce light near the surface the object stands on.
Step 1: Flat color

Start with the shape and one flat color. No shading, no shine. If the shape reads right at this point, everything else will be nice and easy.
Step 2: Shading

The light comes from the top left, so the shadow sits on the bottom right. Draw the edge of the shadow as a smooth curve, with the same rules as any curve: the runs change by one or a couple of pixels at a time. Fill it with the darker red.
Then the terminator: the last band of shade just before the light side starts. It's the darkest red, and it's thin. In real life the terminator is quite thin too. That's the rule "shades get thinner near the terminator", and it's what makes the ball look round instead of cut in half.
Step 3: Lighting

Now the black outline goes. Each part of it takes the color of the surface it touches: red next to the lit part, the terminator color next to the terminator, the shadow color next to the shadow. Then a small highlight of the brightest color on the top left, where the light hits first. A few pixels are enough.
Shade from the light, not from the outline. If you put the dark color all around the edge and the light in the middle, you get pillow shading, and the ball looks flat and puffy.
The same rules on four more shapes
Every object in a game is made of simple shapes, so once you can shade these, you can shade anything. Each row goes coloring, shading, lighting, and then a real asset built on that shape.
Cube

Light from the left and slightly above. The left face is the lightest, the top is the main tone, the right face is the darkest. The outline on the lit edge goes almost white. The back top edge is a bit darker than the top, because it sits at the back and catches less light.
Cylinder

Light from the top left. The top is the brightest, the right side gets the shadow, and a narrow highlight band runs down the left side where the curve faces the light. The back rim of the top is a little darker than the front.
Pyramid
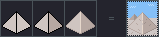
Flat faces, so it is simple: the left face is lit, the right face is in shadow. The outline on the dark side goes even darker than the face, on the lit side a bit lighter.
Cone

A cone is round, so a side is never all dark or all light. Go in bands: shadow on the right, the main tone in the middle, a lighter band, then the brightest band on the far left.
Try it yourself
Finish the sphere above, then press Draw your own and shade your own ball from scratch. The check looks at your light and your lines, not at my picture. After that, try a cube with the light from the top right. Same rules, mirrored.